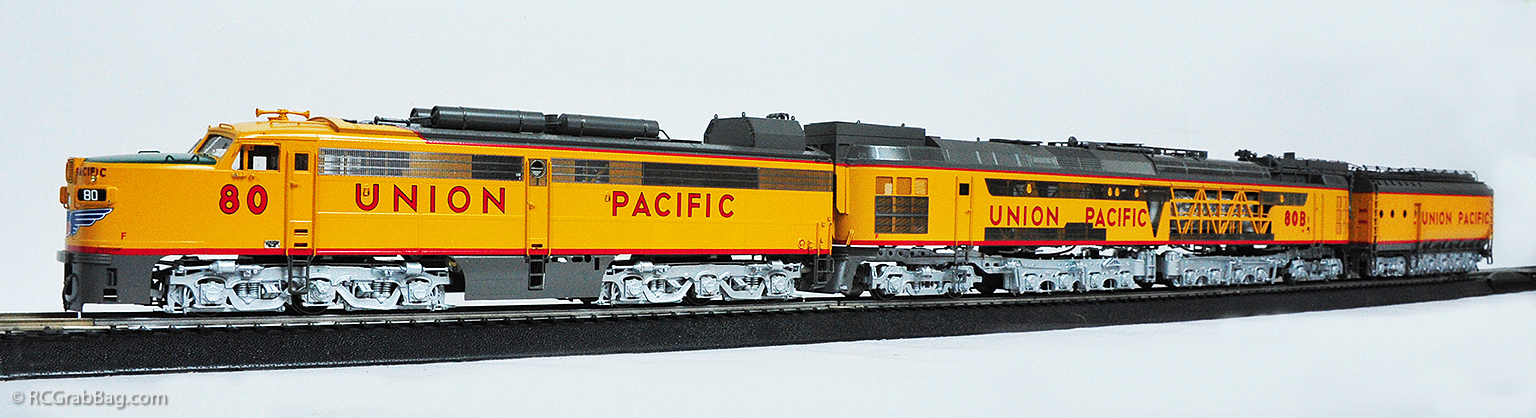
Overland Models UP Three-Unit Coal Turbine #80

After a loooooong search, diligence pays off today.


Union Pacific experimented heavily with turbine power, starting with the experimental steam turbines of the 1930’s, to the combustible fuel turbines in the 1950’s and 60’s. Turbine locomotives like UP’s Standard, Veranda (no pics yet), and “Big Blow” turbines logged thousands of miles during their brief decade of operation. They ran on a cheap, low grade, borderline sludge oil by-product called Bunker-C oil. Regarded largely as a waste product, Bunker-C was understandably cheap, and although the turbine engines consumed large amounts of fuel, the low cost of Bunker-C made the turbine loco economically viable. And the fuel wasn’t easy to use either. It had to be heated to over 240’F just to reduce the thick viscosity enough for it to flow through the fuel system, and it created excess maintenance issues due to the fact that it did not burn cleanly. Nevertheless, the low cost of the product, and the high power output of the turbine engines made the turbines a favorite of the UP fleet.
It wasn’t until the late 1960’s when Bunker-C found other uses in the plastics industry, and as a fuel source for heavy cargo ships, that the price of the product skyrocketed, making the turbine too costly to operate.
UP briefly flirted with the idea of using coal as a fuel source for their turbines, and in 1959, they began construction on this one-of-a-kind monster.

UP #80, pictured here, was the great experiment. The three-unit beast consisted of a lead Alco PA-1, a center unit built from a Great Northern Railway W1-class electric locomotive, purchased from GN in 1959, and a “centipede” tender to carry the coal. The tender also included equipment for pulverizing the coal into dust for combustion in the turbine.
UP #80 was built over a two-year period between September, 1959, and December, 1961. It entered testing in January, 1962, and ran its first revenue run later that year on October 17.
Alas, reliability problems brought the experiment to an early end. The coal dust fuel caused excessive wear on the turbine blades, and pulverizing the coal to dust reliably and consistently was also a problem. The loco was removed from service in May, 1964 and eventually scrapped.


Overland Models produced this fine hand-built HO scale brass model some time in the 1990’s. It’s an exquisite model with loads of hand crafted detail. A while ago, I had acquired an older brass model of #80 produced by New Jersey Custom Brass (NJCB) sometime back in the 1970’s, and it has nowhere near the level of detail and accuracy as this OMI model. I had put out feelers in all directions in an attempt to track this model down. Some time ago I purchased the three-unit “Big Blow” turbine from Chris Irek, owner of Irek’s Toys and Trains in Dallas, Texas, and he had given me an insider tip that a #80 might be coming his way in the coming months. Chris was very good at keeping me informed of this potential acquisition of this model by his shop, and made sure that I had first dibs if and when it finally did come in.


As with my OMI Three-Unit Gas Turbine, #80 here will get a complete tear-down, re-lube, full DCC conversion, and eventual run over at the club layout, so stay tuned!
Update: DCC Conversion Commences:


First order of business was to replace a missing number board. I took a photo of the original remaining number board and mocked up a duplicate on the computer. I printed the graphic out on clear transparency film. I then spray painted the back of the transparency film white and cut out the graphic. I trimmed the number board to fit the space. Not perfect, but pretty close. It’s so small to the naked eye that one would be hard-pressed to notice it’s not original.


Lighting was installed next. In the left photo, cab lighting is added. It’s simply a surface mount LED. It’s extremely bright – too bright as a matter in fact. I had to program the decoder to dim it. In the photo on the right, and LED and short length of optical fiber joined by heat-shrink tubing make up the mars light. Just below the mars light (above the mars light in this upside down photo), the same method was used to create the twin headlights.


The most nerve-wracking task is drilling out the non-functioning marker lights for the purpose of making them functional. Start by centering the drill tip on the lens and begin to LIGHTLY drill the lens to remove a small amount of material to “seat” the drill in the center. Apply a little more pressure and drill through.


Next I took a piece of optical fiber and “mushroomed” the end of it by putting the end close to a heat source (I used a soldering iron). The heat forms the end of the optical fiber into a mushroom shape that makes a ideal lens for the marker light. An LED is joined to the opposite end of the optical fiber using heat-shrink tubing to provide the light source. See how nicely the mushroomed end of the optical fiber fits in the marker light space (right photo).


The decoder installation is pretty straight forward. Finding a place for everything is always a challenge, but once that’s done and the unit is reassembled, the effect is well worth it. Cab lighting, mars light, twin headlights, and twin marker lights bring the model to life.

Reverse light was also installed.


For the center unit, I used a TCS T1 decoder that provides motor control functions and two lighting functions. I used one of the lighting functions to give a bit of interior lighting to the engine area, and the second lighting function to provide a reverse light in the tender. I mounted a speaker in the center unit (right photo) for the turbine sound. Using a QSI Titan Decoder with stereo sound, I was able to program the decoder to output the diesel sound exclusively to the speaker in the lead unit, and output the turbine sound to the speaker in the center unit.


Reverse light is installed in the tender. Although I tried to avoid it, I found it necessary to drill a hole in the bottom of the tender chassis to feed the power lead for the reverse light through, so it could be connected to the decoder in the center unit. A similar connector also runs from the lead unit to the center unit’s speaker to provide the turbine sound from the decoder in the lead unit.
Well, that’s it! I took it over to the club for a run. Have a look:
[wordbay]overland turbine[/wordbay]
Originally posted 2015-08-19 17:48:35.
I WANT IT!!!!! This is like the holy grail of HO Locomotives to me!!!! Oh well, At least I have my NJ Custom Brass one.
It was the holy grail for me too. This stuff is so hard to find!
I currently have the custom Brass version and want an Overland models brass #80 coal turbine
Richard Pontius told me that you may have a sound file for the UP #1 steam turbine.If so I have an Overland model that needs one.The two current suppliers just have the big blow sound which is not the same at all. Regards Dave
I do but it’s for a QSI Titan decoder, which don’t seem to be available anymore.
I enjoyed seeing how you wired this for dcc. I have questions on how you wired the earlier UP steam turbines with the side glow optical fiber. Fantastic Work
John Uehling