Tamiya Rough Rider (1979, 2009)
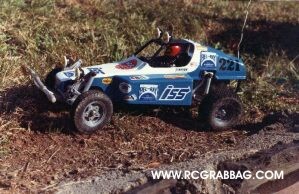
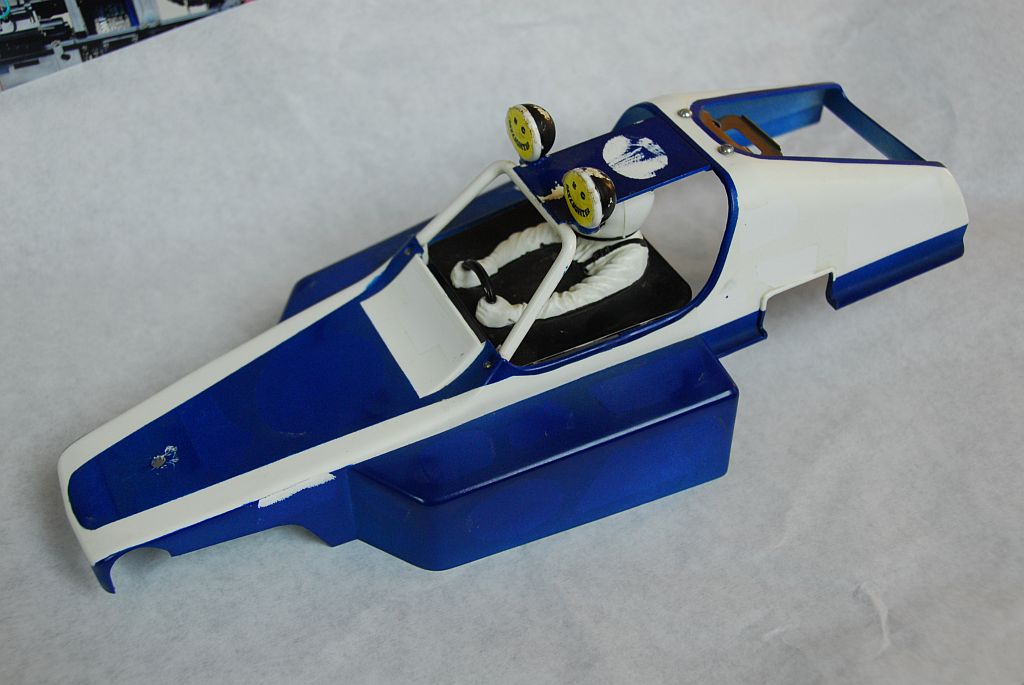
This is my original Rough Rider photographed in the fall of 1981 shortly after I built it.
There are a lot of great memories of this car. I purchased it at the now defunct Allied Hobbies in Montgomery Mall, Montgomeryville, PA, USA. At around $150 for the kit alone, it wasn’t cheap, especially for a kid working part time making minimum wage. But, Tamiya has a way of roping us in.
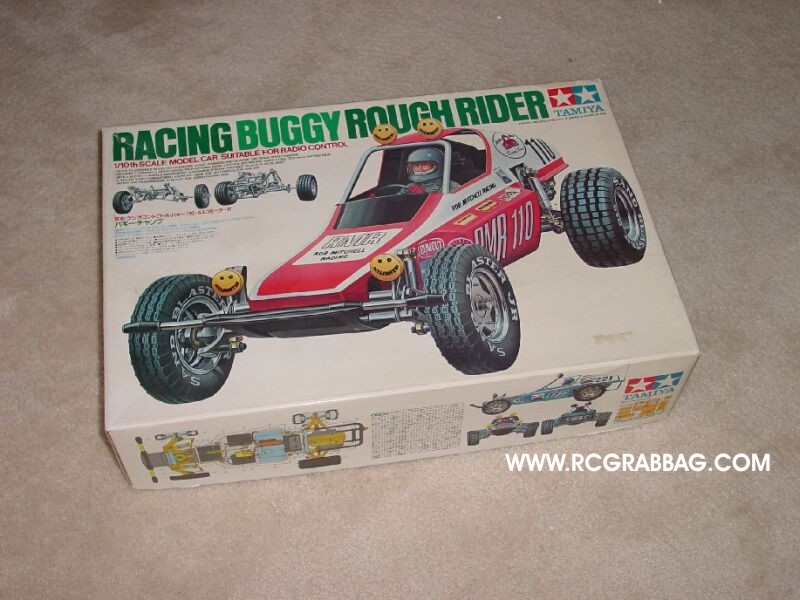
First, there’s the overall size of the box. Just the right chunky dimensions to convince you that there’s something substantial inside. Then there’s the exsquisite artwork on the front of the box, designed to be a combination of the actual model, and the real vehicle.
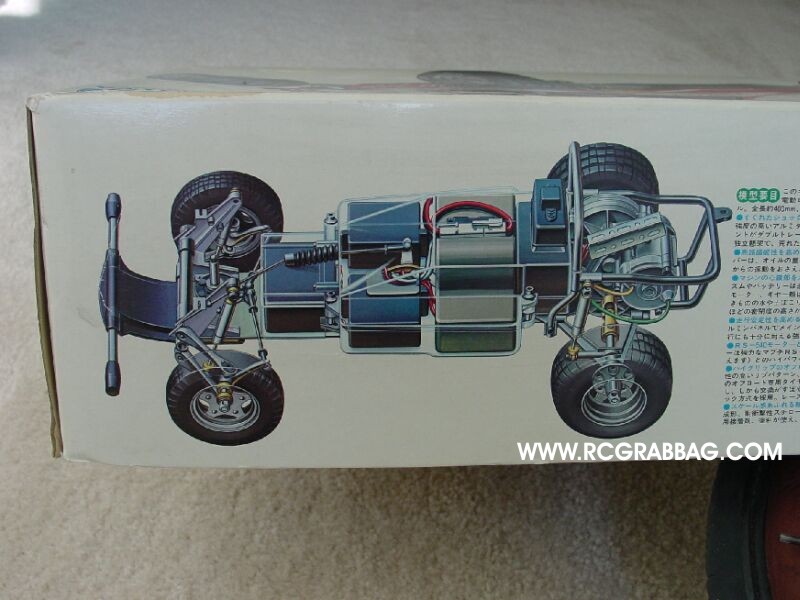
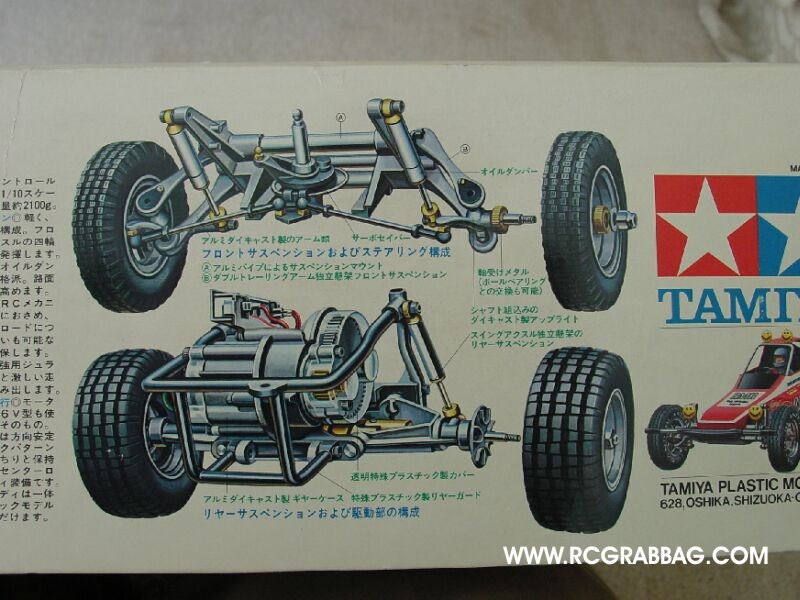
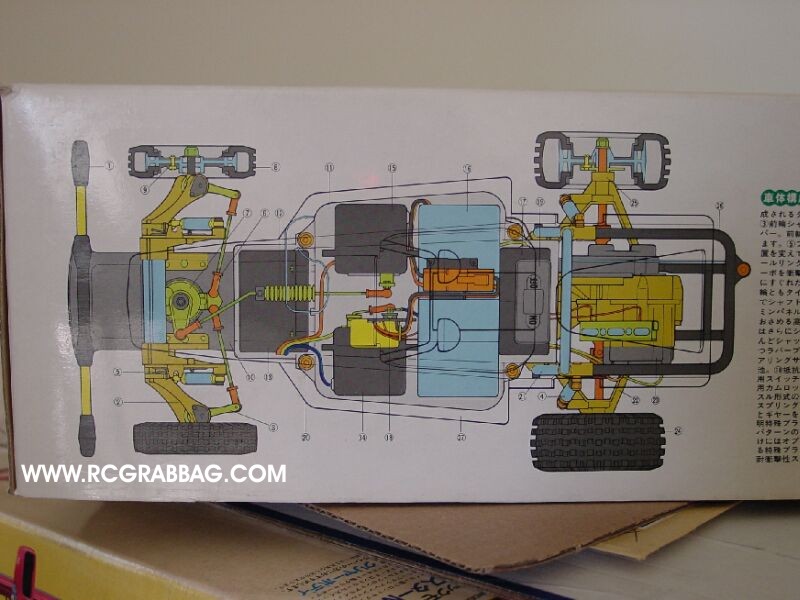
All around the sides of the box are various engineering drawings and schematics to give one a real sense of what they’re buying. How can anyone resist? I remember wanting it just so I could see the suspension built up and up close. Also, at that time, I didn’t know of any RC car that could run off road. This seemed truly revolutionary to me. The RC cars I had up to this time were very much toys. Slow, cheap, and real battery hogs. The Rough Rider was followed up by the incredibly successful Sand Scorcher. It used the same chassis, drive and suspension components as the Rough Rider, but had different body, wheels and tires.
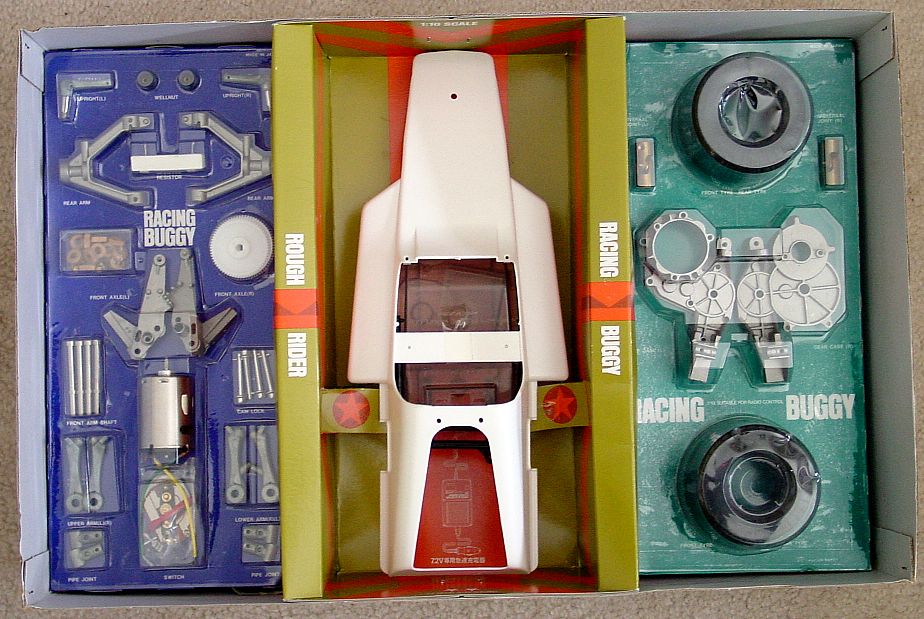
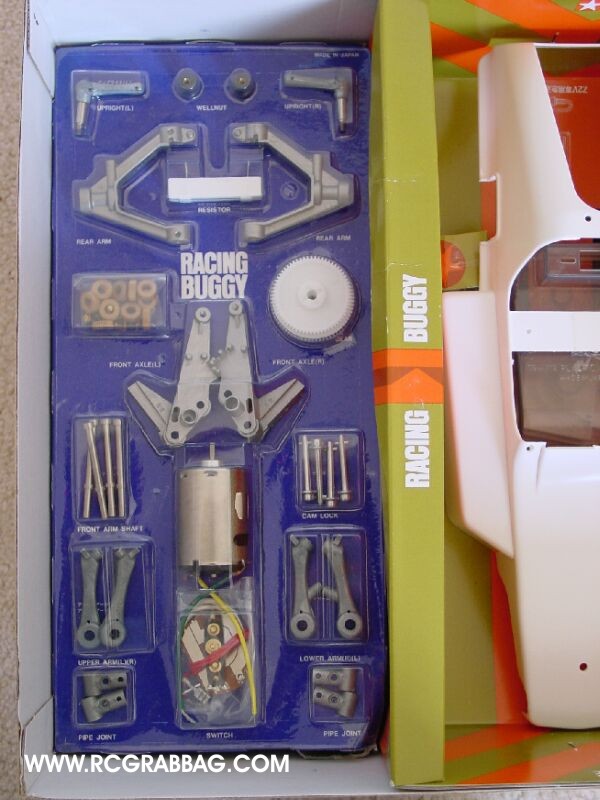
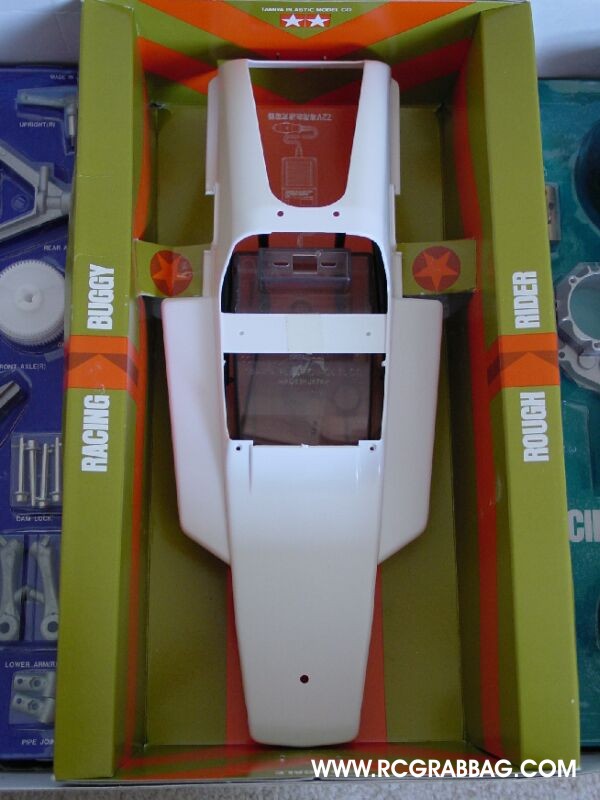
So you buy the thing, take it home, and now the fun begins. Tamiya continues the visual spectacle when you open the box. Various mechanical parts are neatly arranged and labled under vaccu-formed blisters. You’ll notice right away the plethora of metal parts, most notably, the intricately molded metal weatherproof gearbox flanked by the two rear tires. Also striking is the, for the time, monster-sized 540 electric motor. I remember thinking how big and powerful it looked when compared against the rc toys of the day. Today, of course, the 540 sized motor is standard stuff.
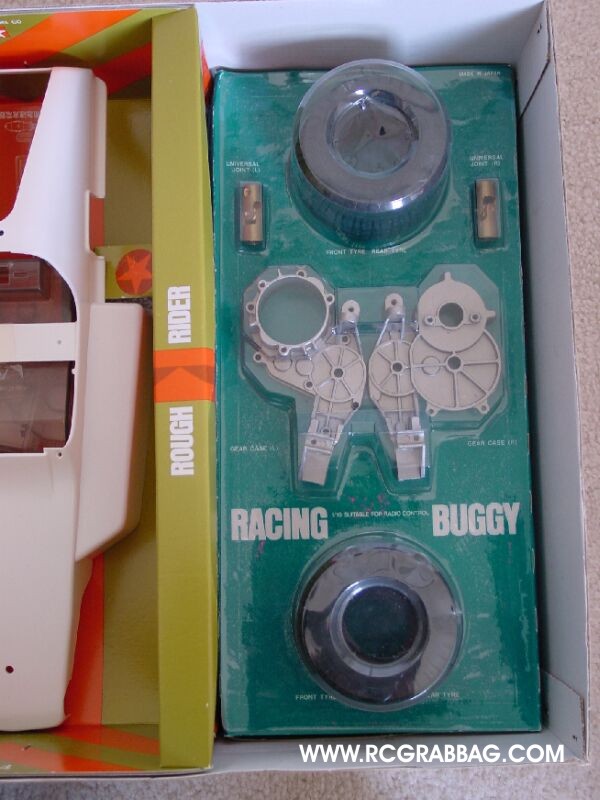
Closeup of the box interior.
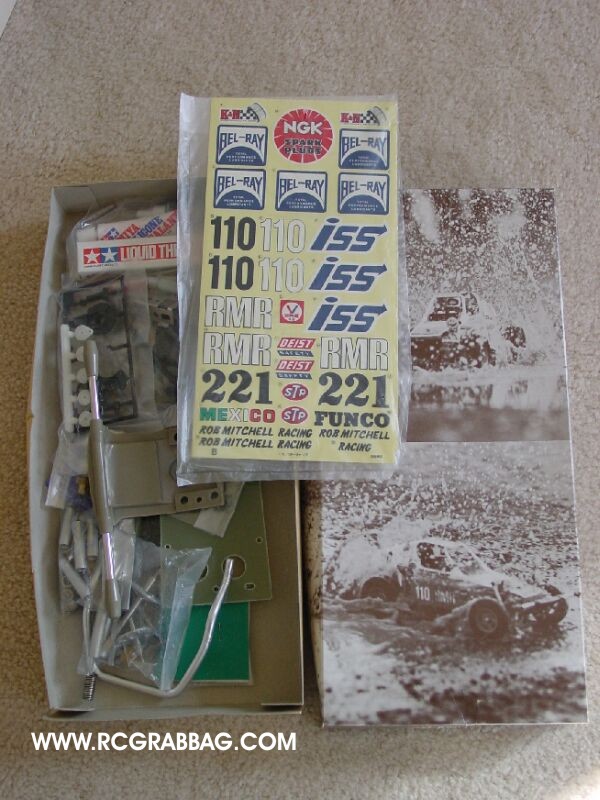
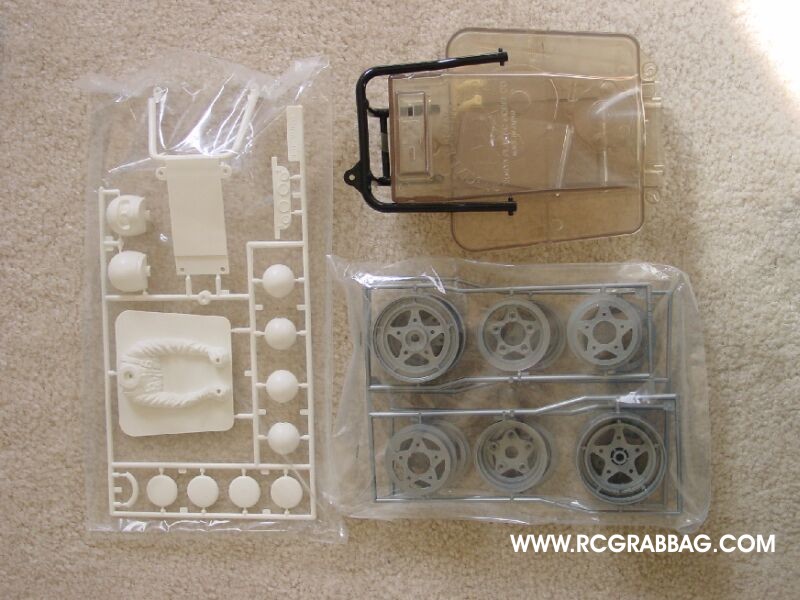
More parts in the kit.
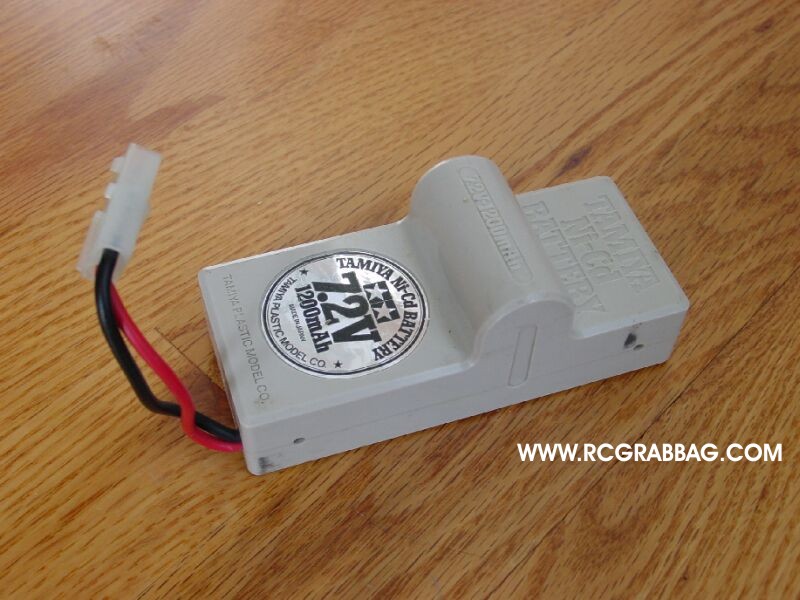

Another shot of my original Rough Rider, taken in the Fall of 1981, just after I built it. For power, the only viable option back then was the Tamiya “Hump Pack” battery, given its name by the characteristic “hump” in its case. It was a 6-cell nicad pack producing 7.2 volts at 1200mah. It gave the heavy, power-hungry Rough Rider about 10 minutes of run time. The hump was Tamiya’s way of putting an extra battery cell in a case with the same length and width as their 5 cell 6 volt pack that was commonly used in their various on-road cars. This preceded the now popular “stick pack”. This battery set me back over $30 in 1981. The two channel Futaba radio was another $99! So, let’s see, $150 for the kit, $30 for the battery, $99 for the radio, $150+$30+$99+sales tax = $300!!! I could have bought a real car for that much in 1981!!!!
I wish I still had my original Rough Rider. Sadly, as parts broke and were no longer available, it languished in storage and eventually, after several moves, it disappeared. I picked this Rough Rider off of ebay. For the collector, ebay has been a great place to pick up spare parts, entire vehicles, and even unassembled vintage kits. The only downside is the prices are usually at a premium, driven up by a fairly large community of collectors. Occassionally, you might come across some old stuff in at a hobby shop or at a garage sale, but ebay is hard to beat with the quantity, quality and ease of finding what you need.
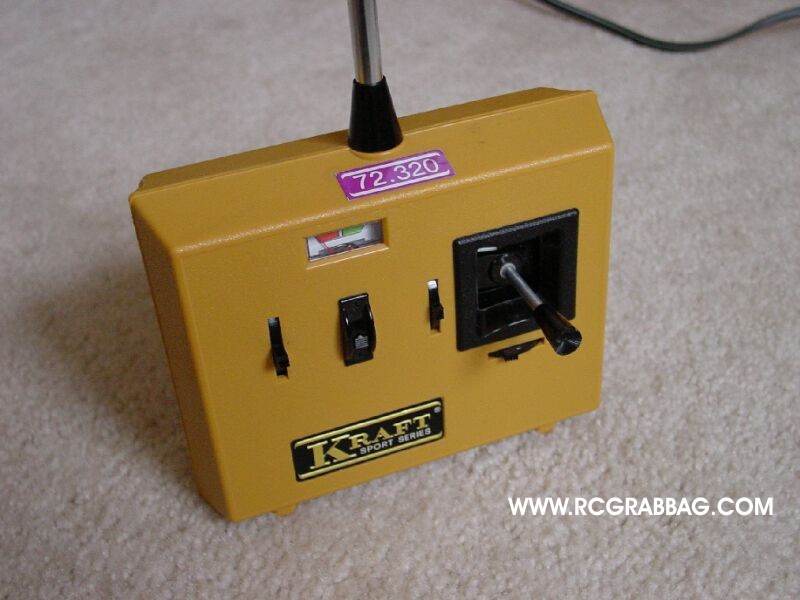
This Rough Rider came fully equipped with vintage Kraft gear. This is a two channel single-stick transmitter. The car is steered with the stick while the speed is controlled by a slider on the left side of the center power switch.
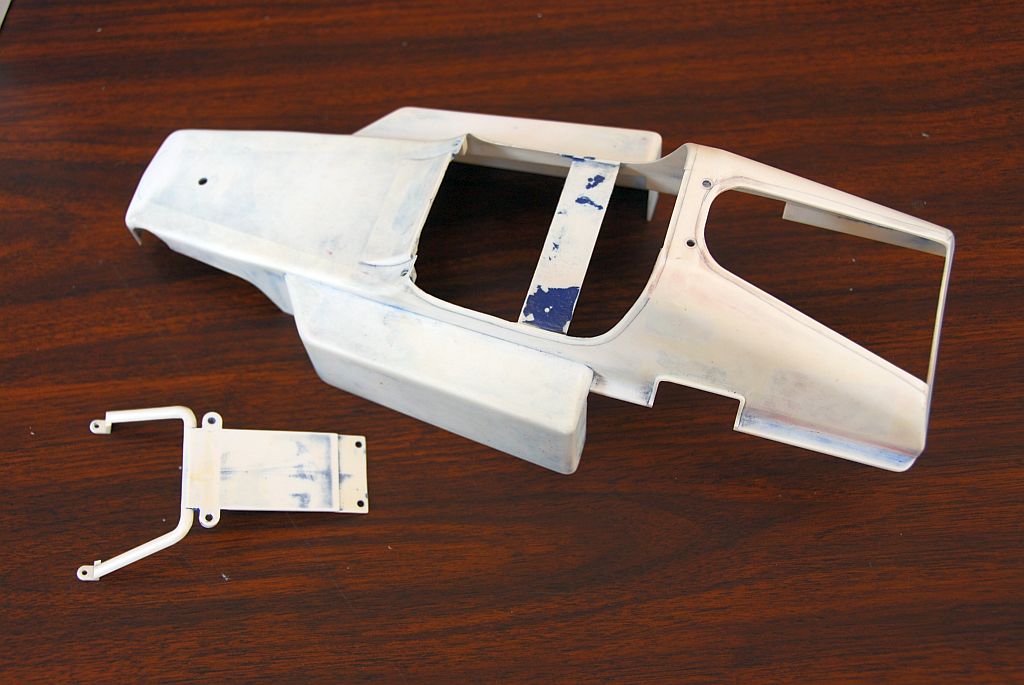
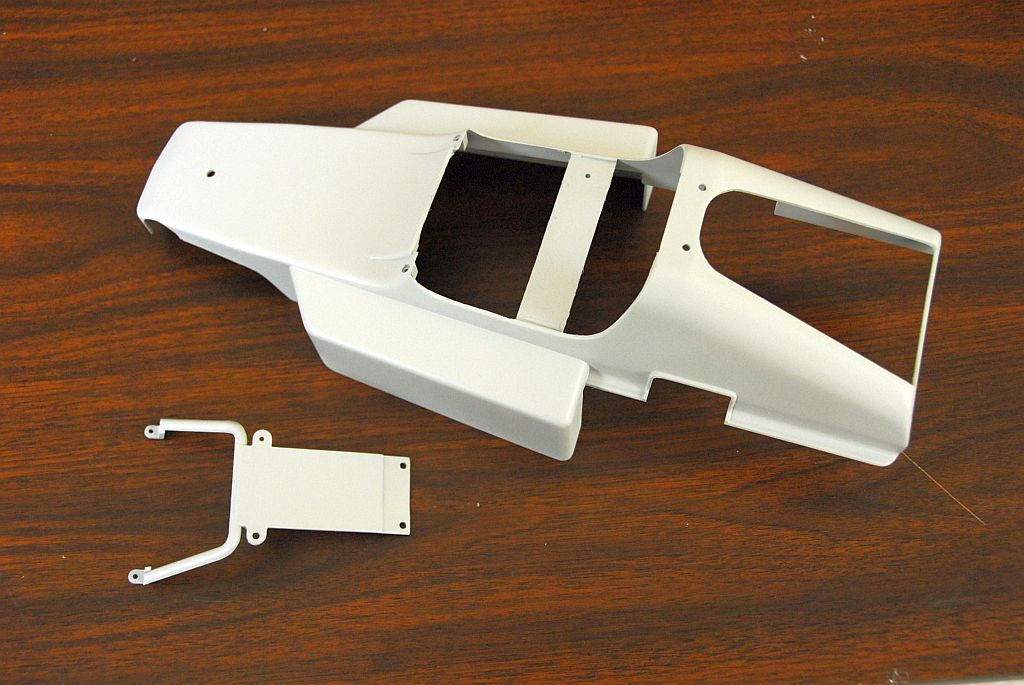
Since it was in relatively good shape to begin with, I began restoring this Rough Rider. First, the decals were peeled off, then paint was removed with a product called Motsenbockers Lift Off Spray Paint and Graffiti Remover (Google it and you find it easily). This was then followed by a shot of primer. I usually shoot it with primer first because primer reveals imperfections in the surface. If the imperfections are small enough, like light scracthes, a few coats of primer will fill them, otherwise I use putty.

With the help of my friend Bill, owner of Joe’s Auto Body and Restoration, we laid down a base coat of Tamiya orange (TS-12). Yes, we started with the orange first instead of the white. This was done when looking over the model and planning the masking tape job. It just seemed easier to put the orange down first, especially for the front. Once the orange had a few days to dry, I did the masking tape edging for the white areas.

Once at the body shop, the rest of the orange was covered up so only the soon-to-be-white areas were exposed.

Next came a dusting of Racing White (TS-7) to seal up the tape edges. Some prefer Tamiya’s Pure White (TS-26), but the box for the Rough Rider spare body indicates the white as TS-7 Racing White. Racing White has more of an off-white cream tone to it. Oddly enough, none of the Rough Rider assembly manuals indicate a color code for either the orange or the white.

See, no problems with covering up the orange with the white.

After pulling off the tape (my favorite part), all the hard work pays off. Next comes the clear coat, followed by the black anti-glare patch on the hood just in front of the cockpit.

A coating of clear coat gives the paint a wet, shiny look and smooths out the surface nicely. Next came the flat black anti-glare patch on the hood just in front of the cockpit. I also painted the underside flat black to cover up the white and orange overspray and give it a nice even look. Decals next!


Decals, thirty in all, have been applied. The decals used are original Tamiya Rough Rider decals and are almost 30 years old! It’s surprising that the adhesive is still perfectly sticky after all these years. A good tip for getting decals nice and straight is to cut a thin vertical (top to bottom) or horizontal (left to right) slit out of the center decal backing to expose a small amount of the decal adhesive. Use the exposed adhesive to “tack” the decal in place and then align the decal properly. Once alignment as been achieved, remove the remaining decal backing and press the decal into place. As a shortcut, I simply pulled the decal backing about halfway back, cut off the exposed backing, and then put it back in place, slightly offset, to expose decal adhesive roughly in the middle of the decal.
Painting and decaling the spotlights came next. Decaling the front of the spotlights is a bit tricky because the fronts are so very slightly curved. This can lead to wrinkling of the decal and/or eventual “lifting” of the decal on the edges. To prevent this, I quickly clear-coated the decals once they were in place with Tamiya Clear. Make sure to press the edges of the decals down firmly to prevent clear coat from seeping underneath.
Painting the driver is not one of my favorite activites. It has to be done largely by hand with small brushes and I’m not very good at it. One thing that helps me do an acceptable job is to use a workshop magnifying glass to magnify the driver figure’s head. It tricks me into making the small and subtle movements necessary to do a good job. The results are “good enough” for me. Without the magnifying glass, it would impossible for me to do a decent enough job.
White-lettering the tires is a real nice detail touch. Some people use a brush, but I got a tip from tamiya101.com to use a small phillips head screwdriver instead. It holds paint nicely at the tip, and you can use it like a pen to “draw” the lettering in between the raised lines.

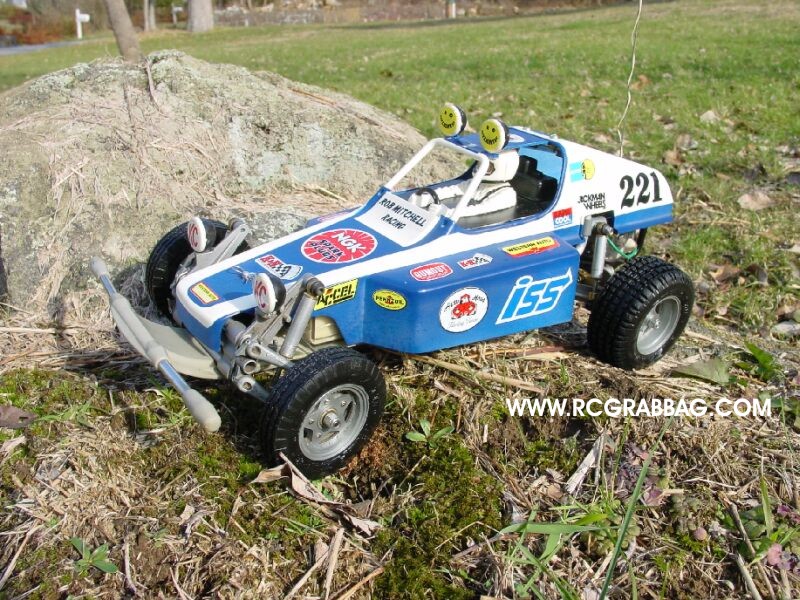
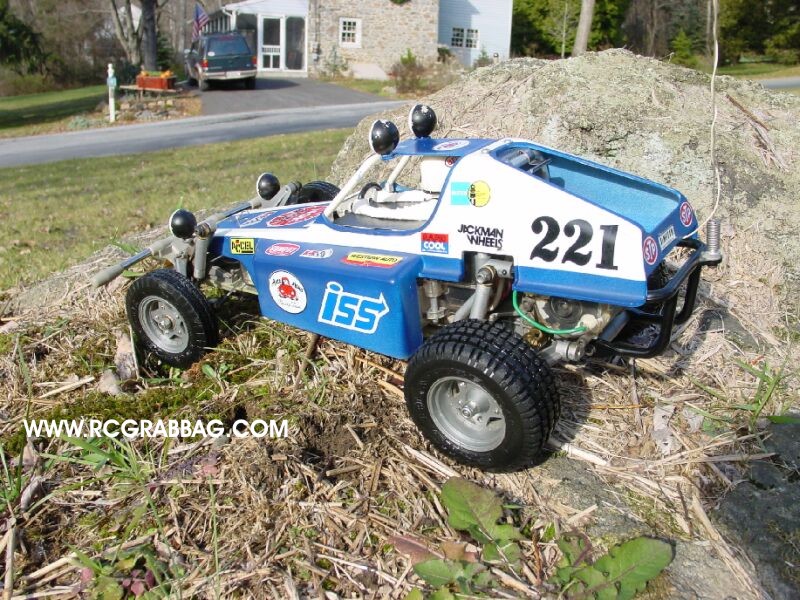
Ta-dah! The finished product!

Well worth the effort, don’t ya think? I want to get outside and take some shots of the Rough Rider in it’s outdoor element, but today was pretty crappy weather, so it’s just studio shots for now.
It’s great to restore an old buggy like the one above, but it would also be great if we could buy one new for cheap (less than $1000). Can it be done? Yes! Tamiya has released the Rough Rider as the Buggy Champ. It’s slightly different than the original, but improved in a number of ways without detracting too much from the charm of the original.


Compare these photos of the new Buggy Champ to the old Rough Rider. Wow, pretty cool, even down to the box artwork and blister parts packaging. See my Buggy Champ article for more details on this incredible kit!

Vintage Tamiya Scorcher Video (and others) here.
[wordbay]tamiya rough rider[/wordbay]
Originally posted 2015-09-06 18:50:48.
I remember the Rough Rider was my first “serious” RC car back in 1982. I also remember I couldn’t believe how fast it seemed back then. Good luck with the restoration.
Can’t beat the ol’ heavy metal buggies. Slow, but way better looking than the new stuff.
Better looking than most new stuff. Tamiya still produces some detailed newer stuff, especially their RC tanks and big rigs.
I loved my Tamiya Rough Rider when I first got it and I love it just as much today. I still have mine but need parts for it (Battery,tires,body) which I am having a devil of a time finding. Anyone got any guidance to share with me as to where I should focus my searches ??? The guts, nuts and bolts of the car are sound and with the above mentioned items I would be able to get it rip roaring again. That would be awesome. I really don’t dig the new off road cars out there and I have never taken to gas over electric. Thanks for any and all shared info people.
Peace out,
MZ
Ebay and Tamiyaclub.com members are your best bet for the parts you’re looking for. I’ve gotten my stuff from these two sources. For the battery, some sellers on ebay make (or you can make them yourself) “hump-pack” battery packs using new nimh or lithium cells since the old batteries were only 1200mah (when new) nicads. Good luck!
Speaking of Tamiyaclub members, here’s an original Tamiya hump-pack battery for your Rough Rider here: http://tamiyaclub.com/trades_model.asp?cid=73036
Hello, I’m the one you bought the rough rider from on ebay. Car looks great!, glad to see it properly restored. It was one of those cars that I regretted to sell afterwards, but makes me feel better to see it in good hands. At least I still have the sand scorcher that I got with that car.
Thanks
David
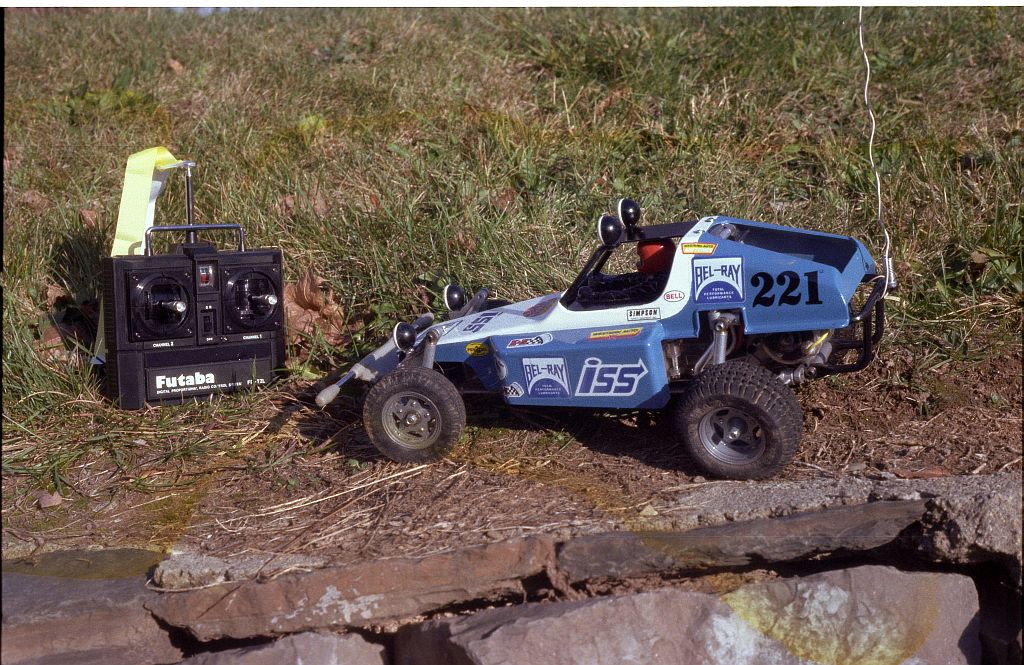
Wow, that’s awesome! I was thinking of rifling through my old emails and Tamiyaclub posts to see if I could find any contact info for the seller, because I recall that we communicated through email and/or a Tamiyaclub post way back then. That was Fall, 2002 that I bought that from you, shortly after I started collecting. Well, like I said, it was a long road to get the RR restored, but now that it is, it will have a proper home on a nice, comfy shelf next to a Blue/White Scorcher. At some point in the next week or so I’m going to take both vehicles for an outdoor shoot, so check back!
I didn’t realize it was that long ago, time flies. I am going to try to tackle painting my Sand Scorcher one of these days. Been kind of scared of doing it due to the masking of all the curves on the body. Once again, nice job on the RR. I will definitely check back!
David
I have an original1/10 scale tamiya military fast attack vehicile from(78-79). As a kid i built, ran it and had a blast with it.i then put it away in a box and stored for almost 40 years.recently i was in the attic above my shop and once again i found it and it is in store quality,but i am having a hell of a time trying to find some parts,(1) i need a tamiya 1200mah 7.2v humped battery and(2) a 3 pin resistor(ceramic).if any one who reads comment and knows where i can buy these,i’d appriciate it. I really loved racing my car it was awesome!!! Thanks don
Ebay is your best bet for parts. The items you mentioned come up regularly, so keep checking.
I’ve been in the process of restoring my Original Tamiya 1/10 scale Hornet (bought 1986). I’m having a difficult time finding an original 7.2 volt hump Tamiya Battery. Any suggestions? is there something equivilent to it that would fit?
Any help would be appreciated!
Rhine
Original hump batteries can usually be found on ebay from time to time. You can also make your own by purchasing stick pack sized cells, arranging them in a hump pack shape, and soldering them together to form the pack. You can use heat shrink wrap to keep it all together. Here is a hump pack on ebay fashioned in that way here.
Hi
I have a original Rough rider complete and un-damaged ( a few scrapes on the body) I also have a fully painted and a complete Sand Scorcher body ( it has the 1/10 vw markings inside the roof )that I never used just in case it got marked that I bought when I purchased the Rough Rider plus the original box for body (slight water damage).
I am looking to sell all of this please can you give me some advise on the value and where the best place to sell it is.
Thanks
The best place to sell and get the highest possible price paid is ebay. Make sure you take lots of pictures and describe them accurately, and you will do well. Have a look and see what they are going for by using ebay’s advanced search feature. Select the “completed listings only” option to see what recently sold items like your Rough Rider have sold for. For the Rough Rider, expect get $500 or more for a good one, and maybe around $200 for the Scorcher body. The UK is a very active market for collectable Tamiya items like the ones you have.
Does anyone know the name of the designer of the original Rough Rider model made by Tamiya?
Amazing job. Can I ask how you did the masking of the white areas so well? Do you cut the tape to shape on a cutting mat first and then apply it? Any tips (I’m about to paint mine)
I used a flexible masking tape for getting the edge detail right. It’s the thin blue stuff in the photos. Beyond that just fill in the rest with regular masking tape as you can see in the photos. Good luck with yours!
Great rc job.Takes some skill to do that.Any tips?