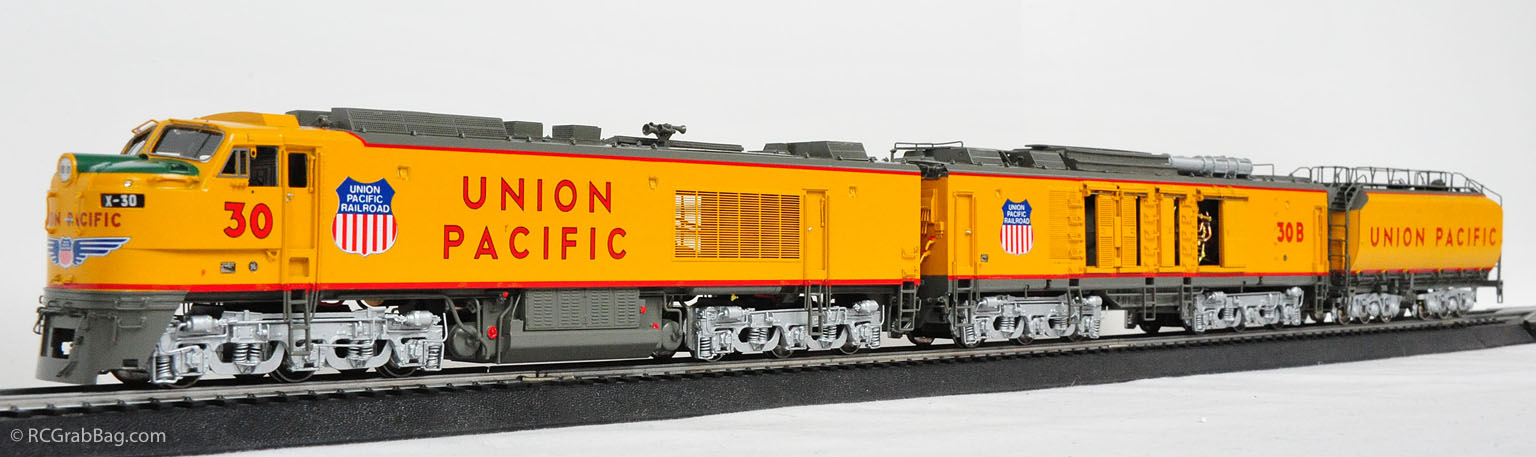
Overland Models Three-Unit Gas Turbine

Overland Models has got to be (or has been) one insane builder of brass model trains.


I tracked down this three-unit gas turbine to a fine purveyor of brass trains, Irek’s Toys and Trains. Produced in 1986, the model appears to be in pristine, never-run condition.

The UP had been experimenting with turbine powered locomotives all throughout the late 1950’s – 1960’s. Some of their turbines, like the 4500hp “Baby” turbines and the later Veranda turbines were considered very successful and logged thousands of miles in their roughly 10yr period of operation. During this period, UP began work on a three-unit gas turbine, affectionately called “Big Blow”. The layout of the Big Blow was unique apart from the Baby and Veranda turbines in that the BB’s turbine was housed in a separate unit entirely. The lead unit housed a 2000hp diesel engine, the middle unit housed the turbine, and the third unit was the fuel tender. The turbine turned a generator which provided electrical power to the traction motors in both the lead and middle units. The total output of the Big Blow was 8500hp, making it the most powerful locomotive ever produced; a record which still stands today.
The Overland Models HO version of this unique locomotive is a work of art. It’s hand-made of brass, factory painted and lettered, and complete with lighting. There is a motor in the lead unit, and in the middle unit. Each motor is flywheel-equipped, and they drive both trucks on their respective units. Fantastic!


Did I say detail was fantastic? Notice even the dummy turbine in the middle unit is detailed with extensive plumbing detail.


Absolutely fantastic craftsmanship.

Even the turbine blades are replicated, and can be seen from the exit nozzle at the rear of the middle unit.
What’s next? I have a Soundtraxx Tsunami turbine decoder which will emit both the diesel engine sound as well as the turbine. The plan is to have the decoder in the lead unit with a speaker to output the diesel sound, and a speaker in the middle unit to output the turbine sound. Should be a fun, scary project.
And now the fun begins…
This model has been sitting around since 1986, so in addition to the decoder installation, a thorough cleaning and fresh lube of the drivetrain is in order.


Starting with the center turbine unit, removing the shell was a simple matter of removing four screws on the bottom of the unit. The plan is to install a TCS silent decoder for control. The original incandescent light bulb will be replaced with a golden white LED. The drive train is a more complex affair, requiring many screws to be removed to disassemble the trucks and gear boxes (there is a gearbox on each wheel set). The plumbing detailing is also removed. The assemblies are loosely press fit into small holes in the turbine itself.


Here the decoder is wired up, and only the interior light remains. A very small (#0603) surface-mount LED replaces the stock incandescent bulb in the rear tender light.


A high frequency oval speaker is placed in the turbine unit in order to best reproduce the high-pitched sounds of the turbine. Meanwhile, a high-bass speaker is placed in the lead unit to best reproduce the low rumbling sounds of the diesel engine. Both will be connected to the sound decoder in the lead unit.

Decoder and LED light are installed in the center turbine unit, and mini-plugs (from Ulrich Models) to connect the rear tender light, and high frequency speaker are threaded through existing gaps in the underside of the shell.

Both the tender light and interior turbine engine bay light (in the middle unit) are lit in this photo. The tender light draws its power from the TCS decoder in the middle unit and is activated in reverse.


Work on the lead unit commences and since it too is powered, a complete disassembly, cleaning and re-lube of the drivetrain is performed.


Pictured here is a Soundtraxx Tsunami decoder, turbine version. On the right, LED’s are used to light the number boards. I’ve replaced the Tsunami decoder with a new QSI Titan decoder. I’m not sure which I like better at this point, but since they both use the same 9-pin plug, I can swap them easily enough. The nice thing about the Titan is that I can load new sound files into the decoder and re-purpose it for just about any type of loco. As a matter of fact, the Titan came preconfigured with steam engine sounds originally, but I was able to download the turbine sound file and load it into the decoder with QSI’s Quantum Programmer. The programmer comes with programming software, and programmer unit hardware that connects to your computer via USB. Leads are connected from the programmer to a programming track.

Number boards are light nice and evenly by the LEDs.


Truly the scariest part of this project was installing the tiny marker lights (the tiny lights just above the number boards). In stock form, the marker lights are tiny plastic lenses, painted silver from behind to reflect light. While they look descent, a model of this caliber deserves to have actual lights. Using a tiny drill, I drilled out the tiny lenses. The important thing in this step is to allow the drill to do the work. The stock lenses are spherical elements (a rounded, bulbous surface) which can allow a drill to slip quite easily into nearby (very nearby) painted sufaces. I placed the drill tip in the center of the lens and applied the lightest pressure while turning. After a few turns of the drill, the drill “bit” into the lens and began to remove material. Only after that happens can you apply a little more pressure, but only a little more.

The marker lights themselves will be optical fiber, threaded through the newly-drilled holes. In order to get the end of the fiber to resemble a lens, you “mushroom” the end by placing it close to a heat source, like a candle flame or a soldering iron. I used the latter and was able to get a nice mushroom head to form by holding it around 1/8 inch from the soldering iron tip for a few seconds.

For the headlight, I removed the stock incandescent bulbs and their holder (it’s press-fit into the shell) and replaced them with 1.5mm optical fiber, backed by surface-mount LED’s wrapped in heat-shrink tubing. I used a very fine emery board to smooth the ends of the optical fiber that would be exposed.


The lights and resulting effect really add to the prototypical appearance of the loco. I’ve also installed an interior cab light, but it’s a bit too bright so I’m working on a solution at the moment (either replacement or dulling it with some gray paint).
See how all the hard work paid off in this video:
Earlier video. Longer. Loco sections weren’t speed matched, so it’s running very slowly.
[wordbay]ho turbine locomotive[/wordbay]
Originally posted 2015-10-03 20:03:06.
It took a lot of ambition (and maybe Prozac) to drill light holes in a $3500+ engine. Nicely detailed article. Having my OMI 8080 pro painted soon, but will probably skip the marker and other light improvements since I’m not going to run it and may affect resale value. Bookmarked your article for reference.
Thanks for looking. I did the same conversion to an OMI #80 coal turbine. Fortunately it’s factory painted. I run ’em so I’m not concerned about resale value and I’d still get a good chunk o’ change for them if I sold.
I love photos of Gas turbine locomotives and u50 locomotives
Have you heard about any model railroad company that will be doing these GTEL 8500 gas turbine locomotives? I am looking for this locomotives DCC and sound.
Thanks,
Benjamin
Not in HO scale unfortunately. I believe MTH made one in O scale, but not in brass.
You just solved a mystery I’ve wondered for a few years. I visited the Illinois Railroad Museum and saw I believe, Union Pacific Gas Turbine X-58 on display. I distinctly remember being fascinated at how it used a jet turbine, and I could swear there was an exhaust outlet on the top rear of the loco or tender that reminded me of a jet fighter’s exhaust outlet.
But ever since, every time I see a model or photo of a UP gas turbine, it does not have anything like this! And it’s been so frustrating for me!
Today the mystery is solved. X-58 is a “Big Blow” and they are the only ones that have the “jet exhaust”. Very cool to see this modeled on this HO scale locomotive. It’s a shame Athearn makes all those nice HO gas turbines but I don’t think they make the “Big Blow” 8500 HP unit.
Correction. IRM has X-18, not X-58.
Glad I was able to help! Yes, the other ‘standard’ and ‘veranda’ turbine’s exhaust exit through square ports on the roof tops. It is too bad we don’t get these offerings like the blg blow in plastic, but I guess their niche status precludes any non-brass manufacturer from taking the plunge.