Making Chocolate at Home
My wife and I are chocolate fiends, so being true to my nature (as a hobby locust), it dawned on me one day that I should look into this mysterious process of chocolate-making and see if it could be done in the kitchen. My wife and I figured we knew good chocolate, and if we were successful at making chocolate, we’d know if it is good or not. But not knowing a thing about making chocolate, other than what we saw when we visited the Hershey factory in Hershey, PA., several years ago, we would be starting from scratch. A quick search on the Internet, and we came upon the website chocolatealchemy.com. This website is dedicated to making chocolate at home and contains tons of info and supplies to make your own chocolate.
After spending a good amount of time on the site, we placed an order for the following:
- Chocolate Alchemists Kit – Contains a sample of cocoa beans of various types and in various states: roasted, unroasted, and nibs (the inside of the bean), cocoa butter, lecithin, and chocolate molds. There are many different types of cocoa beans but they essentially boil down to three types: Carillo, Trinitario, and Forastero. No cocoa bean today is a pure strain of any one of these types. Cacao trees are prolific cross-pollinators, so each of these bean types most likely contains some traits of the others. We chose a Carillo type bean (Mexican Tabasco-just a name, there’s no tabasco sauce in them), because Carillo beans are considered the gourmet cocoa bean. I think as we experiment more, we will most likely blend bean types.
- Behmor 1600 Coffee Bean Roaster – While this is a coffee roaster, it’s great for roasting cocoa beans. Roasting cocoa beans is necessary to unlock the various flavors in the beans and make it easier to remove the beans’ shells (husks).
- Crankandstein Mill – Used for cracking open the roasted cocoa beans. This will release the “nibs” inside the cocoa beans.
- Champion Juicer – Yes, it’s a juice machine, but according to John over at chocolatealchemy.com, it is perfect for grinding the nibs into cocoa ‘liqueur’, the main ingredient of good chocolate.
- Santha Wet Grinder – The Santha is a spice grinder, but John says it’s great for refining chocolate. Ingredients, such as sugar, don’t dissolve in the chocolate liqueur. Simply mixing the ingredients will result in a very gritty chocolate. The Santha smoothes the chocolate by “crushing” the ingredients between electrically driven spinning granite rollers. The wet grinder is also referred to as a ‘melanger’, and I’ll use both terms interchangeably.
- Digital scale and digital thermometer – Ingredients are measured by weight, not by volume, and temperature control is important.
- Chocovision chocolate temperer – Tempering is the last step in the chocolate making process before molding. Tempering creates the texture of chocolate that we are familiar with; somewhat firm with a sort of ‘snap’ when you bite into it. Without tempering, chocolate would be a mushy mess. I got the Chocovision off of ebay.
Everything arrived in about a week. The beans came directly from Chocolate Alchemy, while most of the equipment was dropped shipped. The rest went something like this.
Roasting: First comes roasting. We used the Behmor following the suggested times from chocolate alchemy. The beans roasted very nicely and gave off an aroma of chocolate bread, not that I’ve ever made or smelled chocolate bread before, but if one were to combine the smells, that’s what I imagined it would smell like.

Cracking: Next, the roasted beans need to be cracked open to release the nibs. For cracking, we set up the Crankandstein mill by clamping it over the edge of a tabletop and put a bowl under it to capture the milled beans. The mill works great and will plow through 3-4 pounds of cocoa beans in about a minute.

Winnowing: Once milled, the cocoa bean husks need to be separated from the nibs. This process of separation is called winnowing. You want to get rid of the husks and keep the nibs. I used a blow dryer on the cool setting while stirring the cracked beans with my hand. The husks are light and will blow away while the heavier nibs stay behind. It takes a bit to get a feel for how close to keep the dryer so you don’t blow away the nibs too. Some husks will remain and that’s OK. They will be removed in the next step. The whole process makes a real mess as you can see, even our deck outside wasn’t safe.


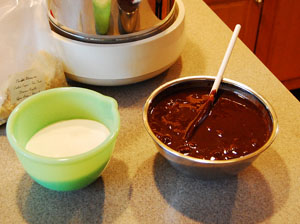
Grinding: Grinding comes next. Grinding turns the cocoa nibs (in the white plastic bowl) into chocolate liqueur; a smooth, thick liquid form of raw chocolate. The Champion Juicer is great for this. It separates the remaining husks from the winnowed nibs and ejects the husks out the front (bowl to the right) while pulverizing the nibs into liqueur and dropping the liqueur out of the bottom (bowl to the left). We put the roasted nibs from the kit through first, just to make sure what came out the other end was what we expected. Once we observed the liqueur and husks coming out of the juicer in the correct places, we started adding the nibs we got from milling the beans. After all the nibs were put through, we took the ejected husks and ran them through the juicer again to eek out the last bit of liqueur. Also during this pass through the juicer, we added cocoa butter according to a recipe on the Chocolate Alchemy website for a 56% cocoa ‘eating’ chocolate.

The resulting liqueur looks like you could eat right now! You could, if you want, but with no sugar it’s like eating liquid cocoa powder; very bitter! The juicer gets warm from the friction of grinding the beans, and this results in a warm, liquid liqueur that flows nicely. You’ll want the liqueur warm and flowing for the wet grinder. It’s interesting to note that you can substitute the liqueur for bakers chocolate in recipes. It’s a lot fresher having made it yourself.

We measured the proper amount of sugar according to the recipe and ran it through a food processor to “pre-grind” it to save a little time in the wet grinder (also called a melanger – I’ll use the words interchangeably) later on.


Refining/Conching: We poured the liqueur mixed with cocoa butter into the wet grinder/melanger first, turned it on, then SLOWLY added the sugar. You don’t want to add the sugar too quickly, as it can can cool down your liqueur too much and even solidify the liqueur to the point that it can seize the melanger. I heat everything in the oven at 140’F egrees, including the melanger bowl. The nice thing is, the friction from the grinding wheels in the melanger will keep your liqueur warm during the refining process. We ran the chocolate in the melanger for about 14hrs. over the course of 3 days. We stopped at night simply because we didn’t want to run the melanger unattended. In between the run times, we would store the chocolate in the melanger bowl in the oven. About 1/2 hour before another run, we would heat up the chocolate to about 140’F to melt it and run it through the melanger again. It is important that the bowl not get too hot (over 170’F) because the stone slab at the bottom of the bowl is bonded to the bowl with an epoxy adhesive that cannot withstand higher temperatures. After 14hrs, the chocolate tasted good and was free of any gritty feel. The ideal amount of time is somewhere between 12-16 hours according to the Chocolate Alchemy website. Once we finished with the melanger, we poured the chocolate into a stainless steel bowl, covered with plastic wrap, and let it sit overnight. This is not a required step, but it was nighttime when we finished with the melanger, so the next step (tempering) would have to wait until the next day.
Tempering: Once the melanger job was finished, it was time to temper the chocolate. This is an important step that requires accurate temperature control. A good thermometer and a slab of marble is one way to temper, but requires a bit of skill and “feel” to get it right. This was our first batch of chocolate, so we are definitely not that skilled yet, so we opted for an automatic tempering machine – the Revolation 2 from Chocovision. There are many sites on the web that deal with tempering chocolate (chocolatealchemy.com has a very detailed explanation about what goes on during tempering), so I won’t go into too much detail here, but tempering is the gradual heating, cooling, and reheating of the chocolate to get the proper crystalline structure to form in the chocolate. The proper crystalline structure is what gives the chocolate its gloss and just the right amount of hardness so it snaps when you break or bite into it and doesn’t melt too soon. Without tempering, chocolate doesn’t keep well and can remain mushy.

This is the chocolate in the Chocovision tempering machine. The device heats up the untempered chocolate to about 108’F. This melts all the crystals in the untempered chocolate. Then it cools the chocolate slowly to about 85’F to get the proper crystals to form. Some improper types will form as well, but this is a necessary part of the process. The machine then reheats the chocolate to about 90’F to get only the desirable crystals to remain. Each crystal type (there are 6 in all) forms or melts at different temperatures. Good chocolate contains a majority of type V crystals to make it just right. Once tempering is complete, the machine emits an audible alert. Molding can be done now.

Molding: It’s best to use a pastry syringe to suck up the chocolate and squirt it into the mold. Ours was too small, so we had to spoon it in. But it wasn’t too difficult. Once in the mold, rap the mold a few times to get the chocolate to smooth out. Now just sit back and allow the chocolate to solidify. You can put it in a refrigerator to accelerate the cooling process.

The finished chocolate! Notice the shine on the surface of the candy pieces. This indicates the chocolate was well tempered.
Success! (or, eating): On our first batch yet! We really enjoyed making chocolate, and I have to say, it tastes great! We will try some different types and blends to see what we can come up with. It should be fun to experiment!
Since then: A few months later, the holidays rolled around. I had been experimenting with different confections and felt I could put on some sort of display for our family gathering. This is the result:

This is a shot of some chocolate confections I made for a recent Christmas gathering at our home.


In the center of each plate are peanut butter cups (covered in milk chocolate), surrounded by hand-dipped dark chocolate truffles, surrounded by a combination of dark chocolate peanut and almond clusters, and solid dark chocolate pieces molded in holiday shapes.
I was excited about your project until I started researching the prices on the equipment. Looks like you spent a couple grand? I think I’ll get the chocolate making idea out of my mind. Glad you had fun and were successful. Thanks for sharing your experience! -Julie
You can get by without all the equipment, but as you might imagine, the chocolate you make will be quite different than what you might be used to. For some examples, the mill to crack the beans is not necessary. You can do this by hand, but it’s more difficult and takes longer. You don’t need a roaster. You can roast cocoa beans in an oven. You don’t need the tempering machine. This can be done on a marble slab, but requires some experience, so practice will be needed. The melanger is a tough one, and it’s difficult to get by without it. Sugar doesn’t dissolve in chocolate. You have to pulverize it until the particles are so small, you can’t detect them while eating. That’s what the melanger does. Without it, expect very gritty chocolate. The juicer is also a tough one. Hard to get liqueur from the nibs without it. Some folks have used coffee grinders, but if you’re going to buy equipment to do it, you may as well get the one best suited for the job. So I would say the essentials are the melanger, and the juicer, and then of course, cocoa beans. I think all of this can be had for under $1,000.
This is excellent!!! I will definitely get all the equipment cause I just don’t want to ruin the chocolate. I would love to know what you thought about the taste of your chocolate. Did you use it in any recipes, i.e., brownies, cakes or cookies, since you started making your own chocolate? I can see that you have a great shine on your chocolates! Very good job you two did! If you have done any further work in chocolate, please, post it!
Annette
I’ve gotten pretty good at it since making around 10 batches of milk and dark chocolates. I haven’t used the liqueur in any baking, but I’ve made lots of candy which, in my own humble opinion, has been far superior to any off-the-shelf stuff barring Godiva and Ghiradelli. I’ve recently made peanut butter cups and I think I nailed the pb filling formula! I will get around to posting some updates in the near future.
Can you elaborate on how this home-made chocolate compares to best factory-made chocolates? I read that Criollo beans featured secondary, long-lasting tastes that were complex and pleasant, in addition to the main chocolate taste. Did you notice any of this complexity in taste while preparing chocolate from lots containing Criollo beans? Thank you very much for sharing.
I am enthusiastic for this. I am thinking of buying a fruit press attachment for my Kenwood mixer which I think should function pretty similar to the Champion Juicer (I have the Major 1500W mixer which is a beast). The melanger is the one thing that is stopping me. I wish I could find a way around it.
My palette is probably not quite that sophisticated, but I can say that the home-made easily compares with the better brands, because the better brands use the fewest ingredients – less fillers. Just chocolate, sugar and maybe some added vanilla, cocoa butter and lecithin. The Criollo beans are generally regarded as the finest. I used a variety that had a very tangy, fruity taste to it, secondary to the chocolate taste. I used this one variety of bean for my very first batch of chocolate. I now blend about 3-5 varieties of beans when I make chocolate to “even out” the taste a little bit. The melanger is a necessity I’m afraid, due to the need to “crush” the sugar (sugar won’t dissolve in chocolate liqueur) into particles too small to detect in the mouth. Otherwise you chocolate will be very gritty. The melanger also serves to “conch” the chocolate which drives off the effects of volatile acids in the mixture that would otherwise negatively affect taste.
Hello admin, may you help me to contact by email ? I need machine like yours. Thanks,
Hi, you can find what you’re looking for at http://www.chocolatealchemy.com